There’s no single security product that can protect your site 100%. Instead, apply multiple security layers to keep your site safe. Even if you have a small site, you should make sure it’s properly protected because attacks are often performed by bots that select sites randomly.
1. Use a secure password and change it regularly
Use a complex password that is hard to guess, and don’t use the same password for different accounts.
Set a reminder to change your password regularly – at least once per quarter. If you have additional admin users on your site, remind them to change their passwords as well.
Complex passwords are a necessity these days and it can be a burden to remember every single password. The solution is to use a password manager to keep track of all your passwords. In its simplest form, a password manager uses one master password to secure a vault containing all the passwords that you use across websites and online services. Many have functions to automatically type the stored password for you, saving you from copying and pasting, or worse manually typing them in. The best password managers work across all platforms including mobile phones and tablets.
Popular password managers
Most password managers are a paid service, and the price is worth the added security. If you require a free solution, KeePass is your best choice, especially in single user environments. It has fewer features than most other password managers but does not take any shortcuts with regards to security.
2. Limit sign in attempts
Another way to prevent unwanted access to your site is to limit sign-in attempts. This blocks the WordPress sign in page after a certain number of failed sign-in attempts, making it harder for bad actors to guess your username and password. Not just bad actors, but also bot that try to brute-force guess the admin password. This is why using a secure password and changing it regularly is so important.
- Sign into your WordPress dashboard.
- In the left-side menu, select Plugins > Add New.
- Search for “Limit Login Attempts Reloaded”.
- Select Install.
- Select Activate.
- Go to Settings > Limit Login Attempts.
From the Settings page you can change how many attempts a user gets, set how long they are locked out for, set what kind of notifications you get when a lock occurs, and make the plugin GDPR compliant.
From the Logs page you can Safelist/Blocklist specific IPs and/or usernames.
3. Keep your site updated
Make sure you update WordPress, plugins, and themes regularly. The newest versions contain security improvements and bug fixes for vulnerabilities that exist in previous versions. Allowing outdated software to continue running makes your site vulnerable because bad actors can simply exploit the known weak points in the outdated version, using them to gain access to your website, including all the data you may have on customer and their purchases.
To update your WordPress:
- Sign into your WordPress dashboard.
- At the top left-hand corner of your dashboard, if there’s a notification that the new WordPress version is available, select Please update now. Note: If you don’t see the notification, your site is already running on the latest version of WordPress.
- From the same page you can also update all the installed plugins and themes.
4. Delete themes and plugins you don’t use
We recommend deleting plugins and themes you don’t use. Unnecessary software can make your site more vulnerable, especially if you forget to update it regularly.
5. Use a security plugin
Having a security plugin adds additional layers of security to your site. There are many free and premium WordPress security plugins available. Note: It may be best to work with your webmaster or developer to install and configure a security plugin. They will be able to recommend the best option for you and have the knowledge and experience to get it setup correctly.
6. Get an SSL certificate
Having an SSL certificate is necessary for the security and credibility of your site, especially if you sell services or goods online. It has also become one of the key factors that affect your ranking on search engines, so it’s beneficial for SEO.
There are several plugins available for WordPress that enable using SSL, most of which are free.
While in the past SSL certificates were expensive, that is no longer the case. Let’s Encrypt provides free SSL certificates to anyone, as well as tools to automate the maintenance and renewal of their certificates. It can be a little tricky getting started with SSL so feel free to contact our support team for assistance.
7. Watch for unexpected changes on your site
Although prevention is key when it comes to WordPress security, it’s also important to know what to look for in case bad actors do manage to gain access to your site. Signs that your site might be compromised are a sudden increase in traffic and/or unexpected changes in the overall amount of disk space consumed by your website. Additionally, you may see an increase in the number of emails being sent from your website with a corresponding increase in complaints of users receiving spam from you.
To detect the sudden change in traffic, you can connect your site to Google Analytics and monitor the data.
To make sure the space your website uses has not increased, check the size of your site in the WordPress dashboard.
- Sign into your WordPress dashboard.
- In the left-hand menu, select Tools > Site Health.
- Select Info.
- Select Directories and Sizes.
- Next to WordPress directory size, you can find the total size of your site. In the rows below, you can see the size of the Uploads, Plugins, and Themes directories.
Keep track of these numbers in a spreadsheet so that you know for sure when there has been significant change. By comparing the results on a regular basis, you will notice when something is suspicious and can take the necessary steps.
8. Back up your site regularly
If your site does become compromised, having a clean recent backup can save the day by allowing you to restore a clean version of your site. In WordPress, you can use UpdraftPlus, a free plugin to schedule automated backups, so you don’t have to do it manually.
Alternatively, you can add a 100% managed nightly backup to your hosting plan by contacting us. We will set it up and manage it for you for a small annual fee, giving you better security and peace of mind.
 To begin, log in to your email account through the web interface at
  To begin, log in to your email account through the web interface at
  To begin, log in to your domain administration account through the web interface at
 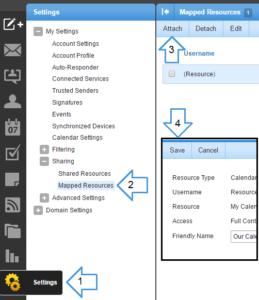 For a user to view a shared resource they must map it to their account. Auto mapping options are also available when setting permissions for a shared resource. To begin, log in to your email account through the web interface at
 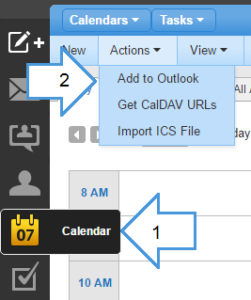 To begin, log in to your email account through the web interface at
 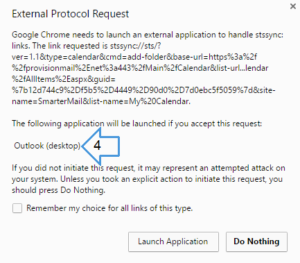 The resource should be available to the Outlook Calendar.